Professional & Amiable Guitar Tuition in Leeds. ™
Professional & Amiable Guitar Tuition in Leeds. ™
Learning how to read guitar chord boxes is one of the first little hurdles most beginners come across. At first, they can look like a strange grid of dots and lines, but once you understand what each part means, they become much less intimidating.
A chord box is simply a picture that shows you where to put your fingers on the guitar. It is not there to make things complicated. It is there to save you time.
In this lesson, I will break chord boxes down into the basic parts so you can look at one and understand what it is asking you to do.
A guitar chord box is a small diagram that represents part of the guitar neck. It usually shows the strings, the frets and the finger positions for a chord.
When you are learning open chords like G, C, D, Em or Am, chord boxes are very useful because they give you a quick visual guide. Instead of reading a long written explanation, you can see the shape of the chord straight away.
The important thing is not to panic when you see one. You only need to understand it one piece at a time.
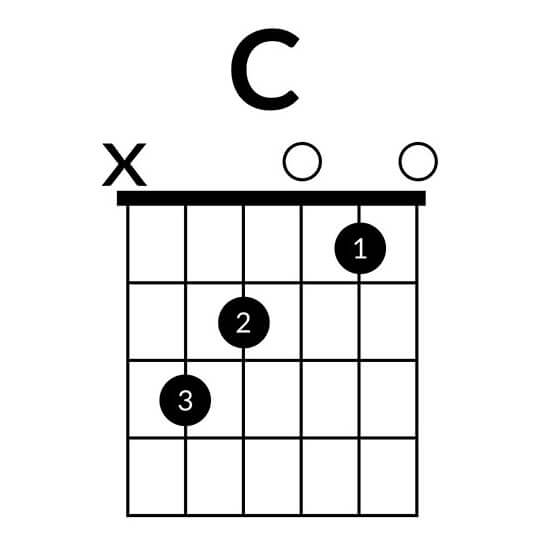
On most chord boxes, the vertical lines represent the six guitar strings. If you imagine the guitar standing upright in front of you, the thickest string is usually on the far left and the thinnest string is on the far right.
From left to right, the strings are:
E, A, D, G, B, E
The first E is the thick low E string. The last E is the thin high E string. They have the same letter name, but they sound very different.
The horizontal lines represent the frets on the guitar neck. The spaces between those lines are where your fingers go.
If the chord box starts at the top of the neck, the thick top line usually represents the nut of the guitar. That is the white or cream piece near the headstock that the strings pass over.
For most beginner open chords, you will mainly be using the first, second and third frets.
The dots on a chord box tell you where to place your fingers. A dot on a string shows which fret that string needs to be pressed down on.
For example, if a dot is on the second fret of the D string, that means you press the D string down just behind the second fret.
Try to place your finger close to the fret, but not directly on top of it. This usually gives you a cleaner sound and helps avoid buzzing.
Some chord boxes include numbers inside or beside the dots. These numbers usually refer to your fretting hand fingers:
1 = index finger
2 = middle finger
3 = ring finger
4 = little finger
This can be helpful when you are first learning a chord, but do not worry if it takes a while to remember. It is completely normal to look back and check.
You may see an O or an X above some of the strings.
An O means the string is played open. In other words, you strum that string without pressing it down with your fretting hand.
An X means the string is not played. You either avoid strumming it, or gently mute it so it does not ring out.
This is one of the details beginners often miss. A chord can sound wrong simply because one extra string is ringing when it should not be.
If a chord box feels confusing, slow it right down. Do not try to understand the whole thing at once.
Start from the thickest string and work across. Ask yourself:
Do I play this string?
Is it open?
Is it muted?
Does it need a finger on a fret?
That simple process makes chord boxes much easier to decode.
Once your fingers are in position, pick each string one at a time. This is a brilliant way to find problems.
If a string is muted by accident, one of your fingers may be touching it. If a note buzzes, your finger may be too far from the fret or not pressing firmly enough.
Do not be discouraged if the chord does not sound perfect straight away. Clean chords take time, especially when your fingertips are still getting used to the strings.
Chord boxes show you where to put your fingers, but your ears tell you whether it is working. Try not to treat the diagram as the whole lesson.
Put the chord shape down, play each string slowly, listen carefully and adjust. That is where the real improvement happens.
If you are also working on changing between chords, my lesson on how to change guitar chords faster will help you put those shapes into motion.
Chord boxes can look a bit odd at first, but they are really just simple maps for your fingers. Learn what the strings, frets, dots, numbers, Xs and Os mean, then take each chord one step at a time.
If you would like help learning your first chords properly, contact me to book a lesson. A bit of guidance early on can save a lot of frustration later.
If you've enjoyed this article, please share it!

Save time and learn faster with Mike. If you are based in Leeds, then I would be happy to help you to become your best at playing guitar.
Learn MoreI am a professional guitar teacher based in Leeds, UK. Having taught 500+ regular students over + years, I am confident that I have the relevant experience to help you to achieve your guitar playing goals & dreams.
Give the gift of music with MJP Guitar Tuition. If you are buying lessons as a present for someone, then our gift vouchers are the ideal solution for you. Learn more...

Copyright © MJP Guitar Tuition. All Rights Reserved.